Wednesday, May 29, 2013

Reverse Shell Border

BY : http://theicedqueen.blogspot.com

The reverse shell border is one of my favorites. Oftentimes when I'm watching TV, I'll catch myself subconsciously practicing the hand motion of the forward and backward whorls. One of the essential tools for the successful execution of any border is a good turntable; I have the one made by Ateco
 First, place the nonstick rubber mat on it…
 …and then your cake.
 Fill a piping bag with medium consistency buttercream icing and fit it with a star tip (I used a #21). Hold the bag at a 45 degree angle just above the cake's surface, close to the bottom (keep about a tip's width between the tip and the cake's board).
 Squeeze firmly, and move the tip in a counterclockwise circle; basically from 3 to 12 to 9 to 6, and then decrease and stop pressure all together as you pull the tip away, forming a tail.
 Over the rough end of the tail, repeat the process, only this time in reverse: 3 to 6 to 9 to 12 and then sweep down while decreasing and then stopping pressure. Note: you could simply do the above piped shape over and over and leave out the reverse part; it would still turn out cute.
 I attempted to take photos while piping one of these shells; this sort of thing is never easy. Here I am going from 3 to 12…
 …and then finishing off from 6.
 Eventually when you reach the back of the cake, you'll probably be faced with a decision:  pipe one shell and have two going the same direction next to each other…
 …or cram in two rather close to each other. I pretty much always go with the latter option.
 Fortunately, most of the border will look nice and balanced.
 If you like, you can also pipe a star in the center of each whorl in the same or a contrasting color.

SUPER FANCY CAKE DECORATING TUTORIAL

BY : http://pezarro.wordpress.com

This is a tutorial to show you how to decorate a cake that makes you look pretty clever.

The beauty of this method is that you can put anything you darn well want on a cake.

No problemo. All you need is a picture off the webz (or a coloring book page, or a drawing you did yourself) and you can make any design you want. 
In this case, A “Dora/Princess” cake. I didn’t know how I would do a “Dora/Princess”, but all I had to do was spend 10 seconds on Google, (“princess dora coloring page”) and there was a coloring page all ready to print out.First, bake your cake and let it cool thoroughly. It needs a flat top, so do what you have to to make it flat.
IMG_5325cakeicedtb
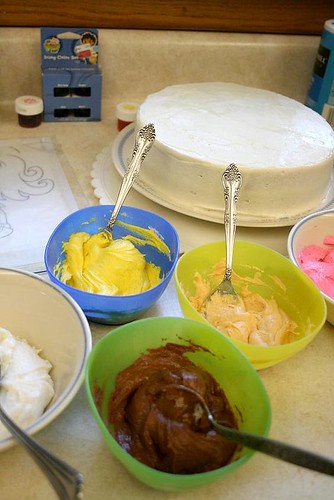
Make your icing; a buttercream made with butter is best. You want an icing that is smooth and soft, but that hardens in the freezer. You will probably want to make a double batch to be sure you have enough to divide into all the colors you need.*When you make your icing, you will want to sift the powdered sugar and mix the icing up quickly so you don’t get lumps. You don’t want lumps clogging up your icing tips in your detail work. Your icing should be of medium thickness, not too stiff. Soft peaks.*Ice your cake. You want a flat-topped cake. The icing job does not have to be perfect, just flat.
IMG_5317picture
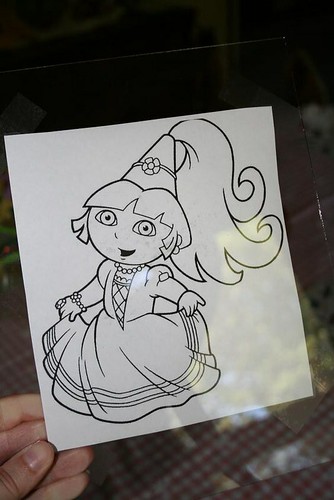
Print out a coloring page, and make sure it is the right size for the top of your cake. You need at least 1/2″ space around the edge of your design on the cake.
*your design will be reversed, so if you are doing a team logo or similar, you will want a mirror image of your original printout.*It is a good idea at this stage to decide how many colors you want to use in your finished design. You might want to mark those colors in the appropriate areas on your coloring page with markers. I didn’t this time, because the design was simple and I was lazy.Trim your coloring page, and tape it to the back side of a flat piece of glass. I always use glass from a spare picture frame.
IMG_5319waxpaper
Tape a similarly-sized piece of wax paper to the front of the glass. Now you have a coloring page/glass/wax paper sandwich.
IMG_5326icingtb
Mix up the colors you will need for your design. Don’t forget to include a dark color for outlines and details.*I prefer to use paste colors because they are vibrant and easily blendable, they don’t thin out your icing, and they last pretty close to forever. One little jar of each of a few basic colors will last you for years. Sometimes you get lucky and find a marked-down pack of specialty colors, like I did.
IMG_5348icingtb
Now the fun part! Fill your icing bags. For the finest details, use a #1 decorating tip — and you don’t have to get fancy if you don’t have actual decorating tips, they just make it easier. As you can see in the picture below, for some of the colors I just used ziploc bags with the tiniest speck of the corner cut off.But for the initial details, you are better off with an icing bag and a #1 decorating tip if you can get one.
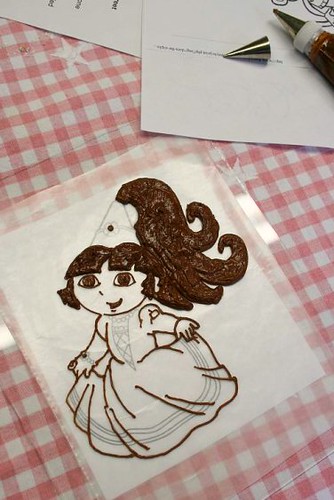
Now, trace over the outlines that you want to see on your finished product. This bottom layer will be the top layer — the one you see — on your design.IMG_5349doraicingtb
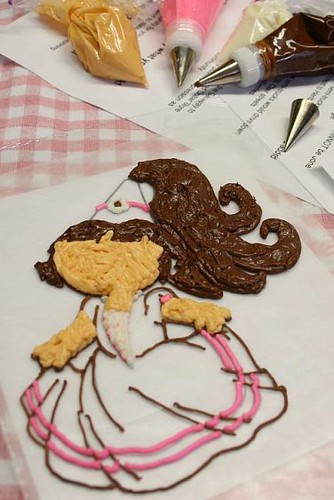
Once your bottom detail layer is established, you can fill in larger areas over the details with other colors of icing. You can’t go back in and put details in at this stage if you leave them out, so think logically, one step at a time. It isn’t hard and you can fix things later if you need to, so don’t stress too much about it.
IMG_5350doraicingtb
Color in all the areas with the icing layers to a depth of about 1/4 inch. Fill in right to the edges and on top of your detail lines, so your whole design is supported by that 1/4″ thickness of icing.You can hold your glass up to the light to see if there are any pinpricks of light shining through your icing design, so you can fix those thin areas before you go on.*This is when your children will come in and inform you that you have screwed up and your icing job was a good try, but it does not look like Dora. You may chuckle to yourself at how ignorant impertinent amazed they will be when you reveal the final design.* Now, take the whole coloring page/glass/wax paper/icing design sandwich, and slip it into the freezer. You want it in the freezer until the icing is hard to the touch. I don’t really know how long that takes, but I’d venture at least fifteen minutes.
IMG_5352cakedecptb
Now is a good time to busy yourself with making the sides and bottom edge of the cake look pretty, or doing the dishes, or having a beer, or whatever.
IMG_5353dorapictb
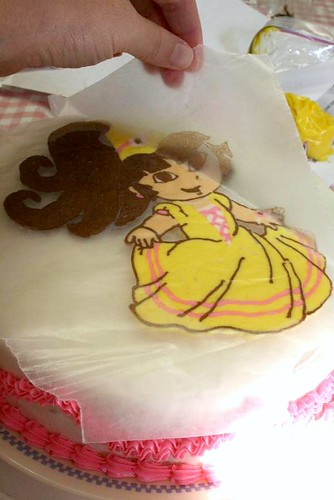
Now — the magic! Take your coloring page/glass/wax paper/icing design sandwich out of the freezer and make sure the icing is nice and hard.Un-tape the wax paper/icing, and quickly but carefully, up-end your design onto the cake. Press it down a little so it sticks.
Then, also quickly but carefully, before the design softens, peel back the wax paper to reveal the design.Now, make the top edge of the cake 
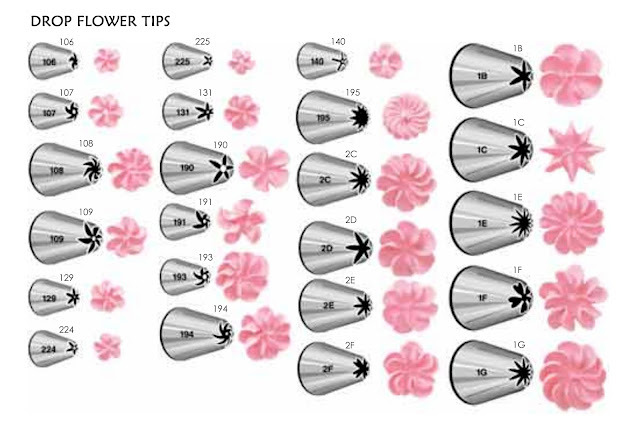
look pretty with some stars or whatever (a #16 tip is good to use for decorating the sides and edges) and pipe your message. Voila! You are a genius!
IMG_5355doraicingtb

Monday, May 27, 2013

Cake decorating tip chart


http://www.candylandcrafts.com/images/decoroundtips.jpg


DECORATING BY FONDANT & GUM PASTE

BY : WILTON

decorating with fondant

If you loved playing with clay as a kid, you'll love decorating with fondant now! You can roll it out and cut it, imprint designs, create dazzling color effects and form it into just about any shape. Rolled fondant is the flexible, easy-to-shape icing that lets you do it all: create easy heart or flower cut-outs and simple hand-shaped ball or ruffle borders. Impress your guests with fun figures like clowns and dolls or spectacular floral bouquets and embossed accents. The easiest way to try fondant decorating? Start with Wilton Ready-To-Use Rolled Fondant. Or prepare one of our easy-to-make recipes here, including a great-tasting chocolate fondant recipe. You'll also find easy poured fondant recipes that cover cakes with a smooth, shiny finish.

add color or flavor to fondant

Learn about coloring & flavoring for fondant cake decorating
It's easy to add flavor or tint white fondant just about any color you can imagine using Wilton Icing Colors. Follow the chart below to create your own custom colors.

cupcake decorating with fondant

Techniques for cupcake decorating with fondant
You can be as fancy as you want when decorating fondant cupcakes.

fondant recipes

Recipes for Fondant
More than just a smooth cake covering, fondant is a great medium for many types of dessert decorating.

fondant tools and accessories

Fondant tools & accessories
Whether you're covering a cake or shaping fondant decorations, there's a tool that will help.

fondant storage and freshness guide

Fondant Storage and Freshness Guide
Take some final precautions and store your fondant dessert the best way possible.

cake decorating with fondant

Learn about covering cakes with fondant
Easy step by step instructions for decorating with fondant to give your cake a smooth finish.

covering cake boards with fondant

Tips for decorating fondant cakes & boards
Don't detract from your beautiful cake with an unsightly board—use fondant decorating!

gum paste and fondant cake decorating techniques

Create masterpieces with fondant cake decorating techniques
These dough-like icings are so easy to cut and shape. You will be creating breathtaking flowers, figures and accents in no time!

pre-made fondant

Pre-made Fondant
No kneading, no mess, no guesswork. Convenient, ready to roll and shape fondant! Available in white, neon, pastel, natural and primary colors.
Resepi Fondan dan Gelatin Icing
Ini adalah resepi fondan yang saya selalu gunakan.Sebelum saya memulakan perniagaan saya telah mencuba pelbagai resepi dari internet dan buku tetapi bukan semua yang dapat hasil yang terbaik.Ada yang menggunakan banyak gelatin hingga menimbulkan satu bau yang kurang menyenangkan.Ada juga yang rasanya sedap seakan2 marshemellow tetapi lantaran resepi itu dicampurkan dengan banyak tepung jagung fondannya akan retak macam elephant skin setelah beberapa jam.Ada juga yang dohnya sentap tetapi nampak berkilat.Pernah juga saya mencuba resepi cook fondan Nicholas Lodge tetapi cepat terkoyak...Ini adalah resepi dari Min Baking Project my sifu...Resepinya tidak mudah terkoyak dan nampak basah kerana kandungan gliserin di dalamnya.
Masa memasak gelatin adalah penting dan bergantung kepada kecairan glukos dan peralihan waktu sebelum campuran disatukan dengan icing sugar.Kalau masa dan tempreture terlebih dan terkurang doh akan melekit kalau suhu terlebih panas atau adunan akan menjadi sedikit apabila suhunya menurun...
 Tips# Untuk doh yang melekit boleh juga dicampurkan dengan icing sugar atau tepung jagung.Jikalau doh keras masak doh beberapa minit dengan double boiler iaitu doh diletakkan dalam stainlees kemudian isi kuali yang berair didihkan api perlahan.

Resepi Fondan

1 table spoon +2 teaspoon serbuk gelatin

1/4 cawan air suhu bilik atau 60ml 
1/2 cawan glukos cair atau 125ml( hanya terdapat di kedai menjual bakeri dan bukan glukos orang sakit minum tu)
30gm lemak sayuran atau 2table spoon 
22gm gliserin  (1 tablespoon)
1  kg aising sugar ( diayak)
# Tips untuk menyedapkan saya gunakan 1 tablespoon esen rose boleh di campur di dalam campuran gelatin atau boleh juga digunakan perisa nenas tetapi doh akan nampak kekuningan...

Caranya

Taburkan gelatin di dalam air biarkan kembang,masukkan gelatin di dalam double boiler iaitu periuk diletakkan  di dalam  pan atau kuali yang mengandungi air masak atas api dan kacau sehingga gelatin menjadi hancur dan cair.
Campurkan  glukos sehingga campuran nampak cair dan tidak kental.Masukkan lemak sayuran hingga cair.  Angkat dari api dan masukkan  gliserin , kacau dan masukkan pula perasa rose esen dan kacau.Biarkan campuran suam sehingga 5 minit.Letakkan gula di dalam satu mangkuk besar dan buat lubang di tengahnya kemudian campurkan adunan gelatin dan uli.Kalau doh terlalu lembut tambah sedikit gula aising dan kalau doh terlalu  keras tambahkan beberapa sudu kecil air...Bungkus dengan ciling film dan masuk  di dalam bekas kedap udara.Doh tidak boleh terdedah kepada udara nanti akan menjadi keras.Resepi ini akan menghasilkan 1 kg pes gula dan tahan  hingga1 bulan dan jangan pula dimasukkan di dalam peti sejuk nanti akan menjadi keras macam batu dan doh berpeluh.Sapukan tangan anda dengan shoterning,sebelum mencanai agar tangan tidak  melekit dengan gula dan taburkan icing sugar atau tepung jagung  di atas permukaan canai supaya doh tidak melekat..Lebih senang kalau ada non stick mat atau boleh dicanai atas plastik..


Ini pula resepi gelatin icing yang boleh digunakan untuk membentuk  bunga2 dan objek.Kalau hendak gunakan fondan pun masih boleh dibentuk cuma bentuknya akan berubah sedikit kalau panas,bunga akan nampak layu  dan tidak  dapat dicanai nipis.Fondan tidak sesuai untuk dibuat sebarang hiasan.Resepi ini menggunakan bahan daripada yang mudah didapati dan macam porselin kalau pecah  serta elakkan  dicanai terlalu nipis takut retak, Saya suka gunakan resepi ini kerana senang dibentuk.Terima kasih kepada http://cherryonacake.blogspot.com/.Oh ya fondan yang dibeli kadang2 retak .Anda boleh mencuba dengan menguli bersama shortening hasilnya fondan akan kelihatan licin...Jikalau  FONDAN melekit boleh gunakan icing sugar atau tepung jagung yang diuli betul2..


Resepi Gelatin Icing

500gm icing sugar
12.5gm gelatin powder
4table spoon(60 ml) air
2 teaspoon (10ml) glucose
Tepung jagung

Caranya
Taburkan gelatin di dalam air selama 2 minit,panaskan secara double boiler hingga cair.Angkat dari api campur glukos biarkan selama 2 minit  kemudian  campurkan dengan icing sugaR yang dibuat lubang di tengahnya dan uli dan tambahkan tepung jagung agak2 hingga menjadi doh dan tidak melekat.Bungkus di dalam ciling film simpan di dalam bekas kedap udara .Boleh digunakan selepas sejam. 

Tips untuk mewarnakan # Gunakan pewarna americolor dan jangan gunakan pewarna air biasa nanti doh melekit2.Kalau gunakan perwarna air atau minyak perlu ditambahkan icing sugar supaya tidak melekit dan boleh juga dibiarkan beberapa minit terdedah di udara untuk mengeringkannya. Caranya picit warna di dalam sedikit  doh yang dicubitkan kemudian campurkan sehingga sekata warnanya dan campurkan balik dengan kuantiti doh yang hendak digunakan.Atau picit warna ke atas doh lalu diuli sehingga sekata..Kalau doh melekit biarkan beberapa minit sehingga nampak sedikit kering dan kemudian boleh digunakan .Doh boleh juga dicampurkan dengan icing sugar atau tepung jagung jikalau melekit.
Tips # Warna akan menjadi lebih terang jikalau doh diwarnakan dan dibungkus kemudian dibiarkan selama beberapa jam. 
Selamat mencuba.........

CAKE DECORATION TECHNIQUES


BY : WILTON

Correct Decorating Bag Position

The way your decorations curl and point and lie depends not only on the icing consistency but also on the way you hold the bag and the way you move it. Bag positions are described in terms of both angle and direction.


Right-Handers

Angle

Angle refers to the position of the bag relative to the work surface. There are two basic angle positions:
90° angle or straight up, perpendicular to the surface. Used when making stars or flat petal flowers.
45° angle or half way between vertical and horizontal. Used for writing and borders.

Direction

The angle of the bag to the work surface is only half the story of the bag position. The other half is direction in which the back of the bag is pointed. Correct bag direction is easiest to learn when you think of the back of the bag as the hour hand of a clock. When you hold the bag with the tip in the center of the clock, you can sweep out a circle with the back end of the bag. Pretend the circle you formed in the air is a clock face. The hours on the clock face correspond to the direction you point the back end of the bag.
Note: Right-handers should always decorate from left to right.

Left-Handers

Angle

Angle refers to the position of the bag relative to the work surface. There are two basic angle positions:
90° angle or straight up, perpendicular to the surface. Used when making stars or flat petal flowers.
45° angle or half way between vertical and horizontal. Used for writing and borders.

Direction

The angle of the bag to the work surface is only half the story of the bag position. The other half is direction in which the back of the bag is pointed. Correct bag direction is easiest to learn when you think of the back of the bag as the hour hand of a clock. When you hold the bag with the tip in the center of the clock, you can sweep out a circle with the back end of the bag. Pretend the circle you formed in the air is a clock face. The hours on the clock face correspond to the direction you point the back end of the bag.
Note: Left-handers should always decorate from right to left. One exception is writing and printing; everyone decorates from left to right.

1M Swirl

1M Swirl

Instructions:

Step 1

Hold tip 1M approximately ½ in. above cupcake top at a 90° angle to cupcake surface. Squeeze out icing to form a star.

Step 2

Without releasing pressure, raise tip slightly as you drop a line of icing around the star in a tight, complete rotation.

Step 3

After completing the first rotation, move tip toward center and up and around to make a second spiral around the inside edge of the first spiral.

Step 4

Release pressure to end spiral at center of cupcake.

cake decorating

It's easy to see when a cake decorating job is well done, with impressive finishing touches and cake decorating techniques such as perfect roses, borders or fondant accents. Here you will get a stepby- step rundown of the essential prep work and cake decorating ideas everyone must learn before starting to decorate.

icing cakes

Cake decorating techniques for the perfect icing job
See the cake decorating techniques for icing an immaculate, crumb-free surface every time.

types of icing for cake decorating

Choose the right type of icing for decorating cakes
Use the right icing for your cake decorating job. Consider flavor, texture, climate and other factors when choosing.

icing recipes for decorating cakes

Various icing recipes for cake decorating
Wilton kitchen-tested recipes were formulated to yield the best cake decorating results.

coloring icing and fondant for decorating cakes

Cake decorating ideas for adding color to icing or fondant
Whether adding color to icing or fondant for cake decorating ideas, it is easy.

cake decorating techniques

Get step-by-step cake decorating instructions
From amazing royal icing flowers to dramatic fondant bows, our step-by-step cake decorating instructions and ideas make cake decorating easy.

cake decorating basics

Cake decorating techniques for choosing the right decorating
Here are cake decorating techniques for how to get your bag and tip ready and master pressure control.

decorating cakes with fondant

Learn a variety of fondant techniques for cake decorating
How do you cover a cake perfectly smooth, without wrinkles or air bubbles? The flexibility of fondant is your secret weapon for perfectly-decorated cakes.
Wilton Fondant Shop

decorating shaped cakes

Cake decorating ideas for shaped cakes
Here are simple cake decorating ideas to follow when decorating shaped cakes in buttercream icing or rolled fondant.

icing consistency for decorating your cake

Choosing the right icing consistency for decorating cakes
Just a few drops of liquid can make a big difference in results. Try different consistencies to see what works best.

decorating cake boards

Methods for decorating cake boards
Don't detract from your beautiful cake with an unsightly board ? decorate it with fanci-foil, tuk-nruffle, or fondant!